Cover every side
Move around the full subject. Add high and low views so the top, base and recessed areas are recorded. Check coverage before ending the session because a missing side cannot be recovered later.
Plan single-image or multi-view 3D reconstruction by separating what the camera records from the surfaces, scale and materials a model must estimate.
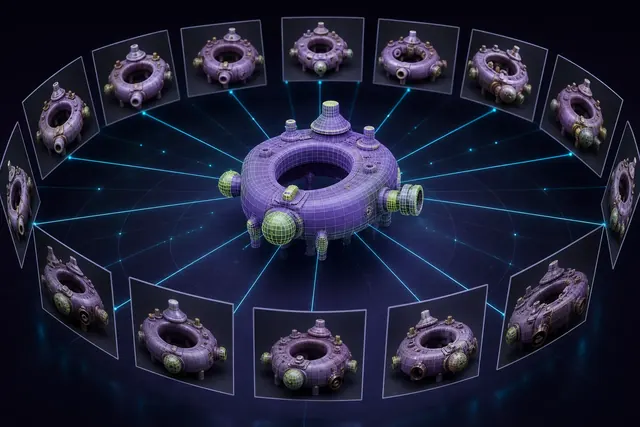
Image-to-3D reconstruction uses one image or a set of views to estimate an object's geometry and appearance. Each photograph records visible contour, color, shading and perspective from one camera position. It does not directly record hidden surfaces, physical scale or the material properties beneath the lighting. When the subject does not exist yet, that single input is often a synthetic concept frame from an AI image generator rather than a photograph, which makes every unseen surface an invention twice over.
A system may fill missing areas with learned patterns, which can produce a plausible object without reproducing the real one. The complete image-to-3D reconstruction guide explains this ambiguity. Additional controlled views provide stronger evidence, but the exported representation still needs inspection.
Use this preflight before reconstruction. The score is a transparent planning aid based on visible input conditions. It does not predict the quality of a particular model or replace an export review.
Use one image when a plausible concept is enough. Use controlled multi-view capture when hidden surfaces and the identity of a real object must be supported by stronger evidence.
Fast and convenient
Requires controlled capture
Mostly inferred from learned patterns
Observed when each side is covered
Useful for a plausible category match
Can support a stronger object match
Concept volume and fast iteration
Reconstruction and spatial capture
More images are useful only when they add clear, consistent coverage. Select the capture method by what must be preserved and what the final file must do. When the only available reference is small or soft, upscaling it before reconstruction can recover contour and surface detail that a plain resize cannot.
| Input | Useful for | Main limitation |
|---|---|---|
| One existing image | Concept volume, rough shape exploration and assets where exact identity is not required. | The back, base, depth and hidden joins must be estimated. |
| Small reference set | Objects photographed from the front, sides, back and raised angles. | Large jumps between views can leave coverage gaps and uncertain matches. |
| Controlled orbit | Static objects that can be photographed with steady focus, exposure and overlap. | Gloss, transparency, motion and weak surface detail can still disrupt reconstruction. |
| Video frames | Quick dense coverage when motion is smooth and the subject remains still. | Blur, repeated frames, exposure shifts and compression can reduce useful evidence. |
A clean input set helps the system connect the same features across views. The aim is consistent evidence, not a collection of individually dramatic photographs.
Move around the full subject. Add high and low views so the top, base and recessed areas are recorded. Check coverage before ending the session because a missing side cannot be recovered later.
Change camera position in small, regular steps. Nearby views should share enough visible features to be connected. Add extra angles around thin parts, openings and deep corners.
Do not rotate flexible parts, open doors or move cables between frames. Reconstruction expects each view to describe the same shape. Movement can create duplicate, stretched or missing geometry.
Keep focus sharp and avoid motion blur. Use a practical depth of field so important surfaces remain readable. Do not change zoom unpredictably during a set.
Prefer soft, stable lighting and consistent exposure. Moving highlights and hard shadows can appear to be surface features. Avoid baked lighting when the material must later work in an engine.
Include a measured reference or record a known dimension outside the frame. Image perspective alone does not provide dependable real-world size. Verify dimensions again after import.
A simple sequence makes it easier to find whether a failure came from coverage, image quality, reconstruction or cleanup.
Decide whether you need a concept, a faithful digital record, a relightable scene or an editable mesh. Note the target engine, platform and interactions. These choices determine whether a neural representation, Gaussian splat or polygon mesh is appropriate.
Keep the subject stable and visible from all sides. Remove moving clutter when possible. Look for areas that are reflective, transparent, very dark, featureless or hidden, then plan extra evidence or manual work for them.
Move around the subject at a steady distance with overlapping views. Add a higher and lower pass when top and base geometry matter. Review sharpness and exposure while you can still retake an image.
Hold back several clear photographs from different angles. Do not send them into the reconstruction. Later, render the result from those camera directions and compare the silhouette and feature placement.
Retain original files, capture notes, tool and version, settings, processed inputs and exports. If you remove backgrounds or adjust images, preserve both the source and edited copies so the reconstruction can be understood and repeated.
Review the raw result first. Recording holes, doubled surfaces, texture seams and floaters before repair helps separate system performance from artist effort. Then track cleanup time and decisions.
Some subjects break the visual assumptions used to connect views. Identify these risks before capture instead of treating every failure as a model problem.
A highlight, reflection or view through glass changes with the camera. That appearance may not stay attached to one surface point. Capture under controlled light, expect manual material work and avoid claiming that uncertain geometry was measured.
Large blank panels and repeated patterns provide few unique features for matching. Add useful surrounding context or temporary non-damaging markers when the workflow permits, then remove them during finishing.
Wires, leaves, handles, deep cavities and overlapping layers are easy to miss. Capture both sides and several oblique angles. Inspect the result without textures because flat color can hide tears and merged layers.
People, animals, cloth and foliage can change shape between views. A normal orbit may combine different poses into one broken estimate. Use a workflow designed for synchronized or dynamic capture when faithful motion matters.
Clipped highlights and crushed shadows contain little recoverable surface information. Review exposure before the full pass. Stable detail is more useful than a cinematic image.
Confirm that you may reproduce the subject and use the photographs for the intended project. Keep source and permission records. A technically successful reconstruction does not settle ownership, privacy or contract questions.
Do not approve the result because it matches the reference image that guided it. Test geometry, appearance and runtime behavior separately.
Render from the angles reserved during capture. Compare outer contour, openings, part positions and proportions. A strong match from an input camera does not prove that unseen areas are correct.
Apply a plain gray material and use neutral light. This reveals dents, holes, fused parts and warped edges that color can disguise. Inspect the back and base as carefully as the hero angle.
Measure the known reference, confirm units and place the object on a ground plane. Repair its pivot and axes before integration. The collision, scale and pivot guide covers these handoff checks.
Look for seams, stretched detail, baked highlights and inconsistent roughness. Decide which appearance belongs in texture maps and which belongs to engine lighting. Use the PBR material guide to review channel roles.
A mesh, NeRF and Gaussian splat offer different editing, collision, lighting and runtime behavior. Compare NeRFs, Gaussian splats and meshes against the actual gameplay need before converting or optimizing.
Store inputs, settings, raw output, repairs, test views and limitations. Mark uncertain or invented regions. The final record should show what was observed, what was inferred and what an artist changed.
Use these checks before moving a reconstruction into a game-production branch.